
In this article, you will learn
- How to Create Kubernetes Cluster in Oracle Cloud
- Access Kubernetes Cluster using Cloud Shell
- Build docker image and push it to Oracle Container Registry
- Create Argo Rollout and perform Canary deployment
Argo Rollouts is a Kubernetes controller and set of CRDs which provide advanced deployment capabilities such as blue-green, canary, canary analysis, experimentation, and progressive delivery features to Kubernetes. To learn more check docs
Oracle Cloud Infrastructure Container Engine for Kubernetes (OKE) is a fully-managed, scalable, and highly available service that you can use to deploy your containerized applications to the cloud. To learn more check docs
Oracle Cloud Infrastructure Registry (also known as Container Registry) is an Oracle-managed registry that enables you to simplify your development to production workflow. Container Registry makes it easy for you as a developer to store, share, and manage container images (such as Docker images). To learn more check docs
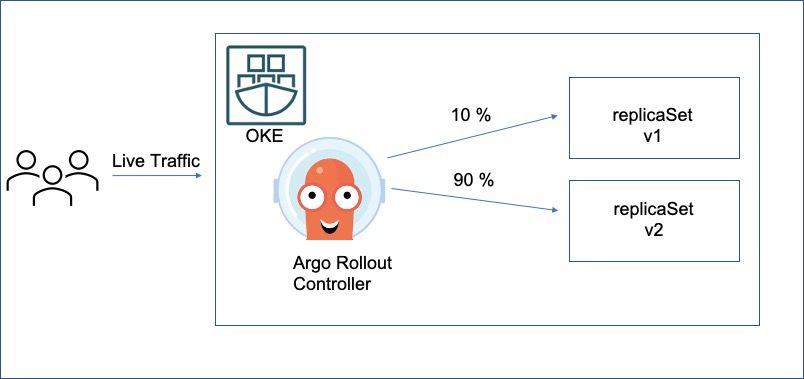
A canary deployment is a deployment strategy that releases an application or service incrementally to a subset of users.
Creating Kubernetes Cluster
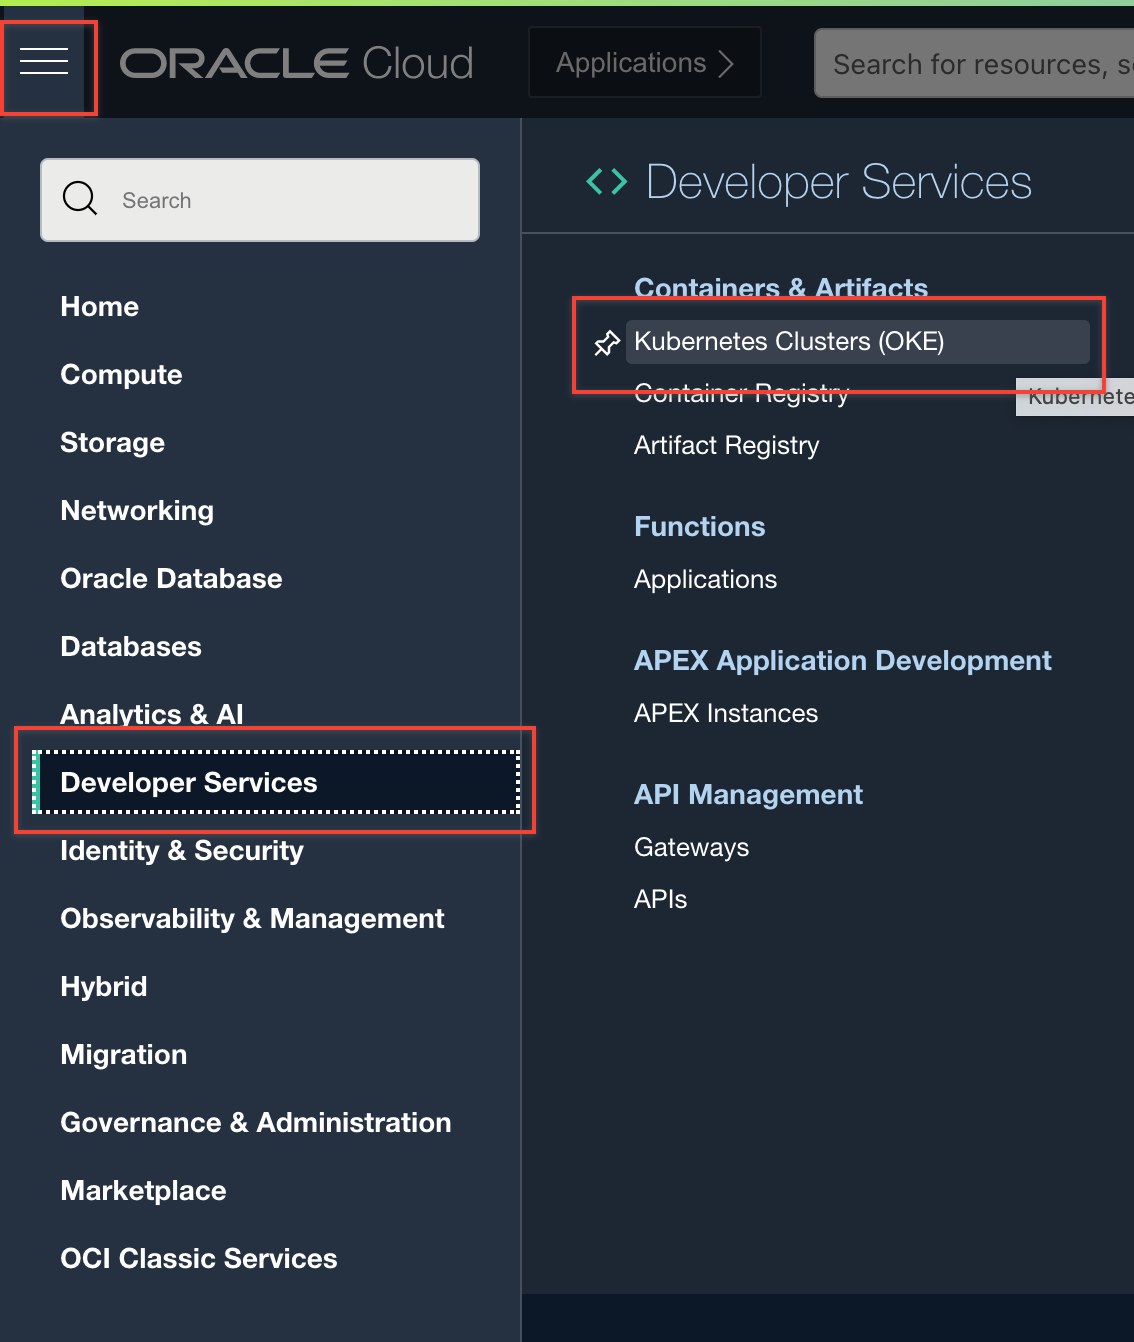
- Click on Hamburger menu -> Developer Services -> Kubernetes Cluster
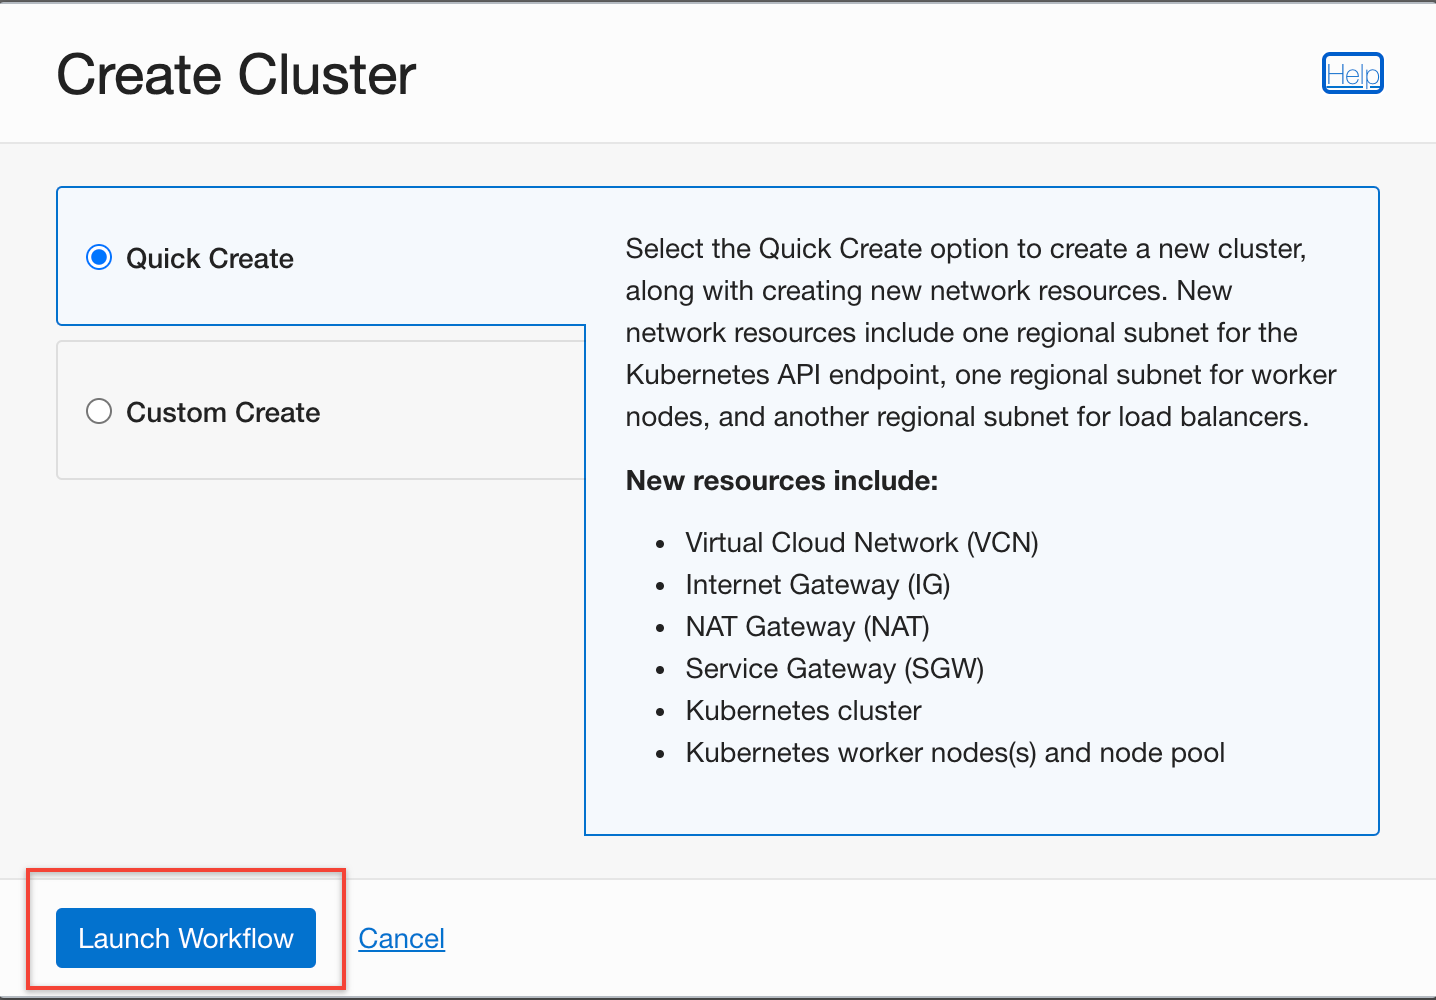
2. Click on Create Cluster

3. For purpose of this article will select Quick Create option, but if you know what you are doing go ahead with Custom Create.
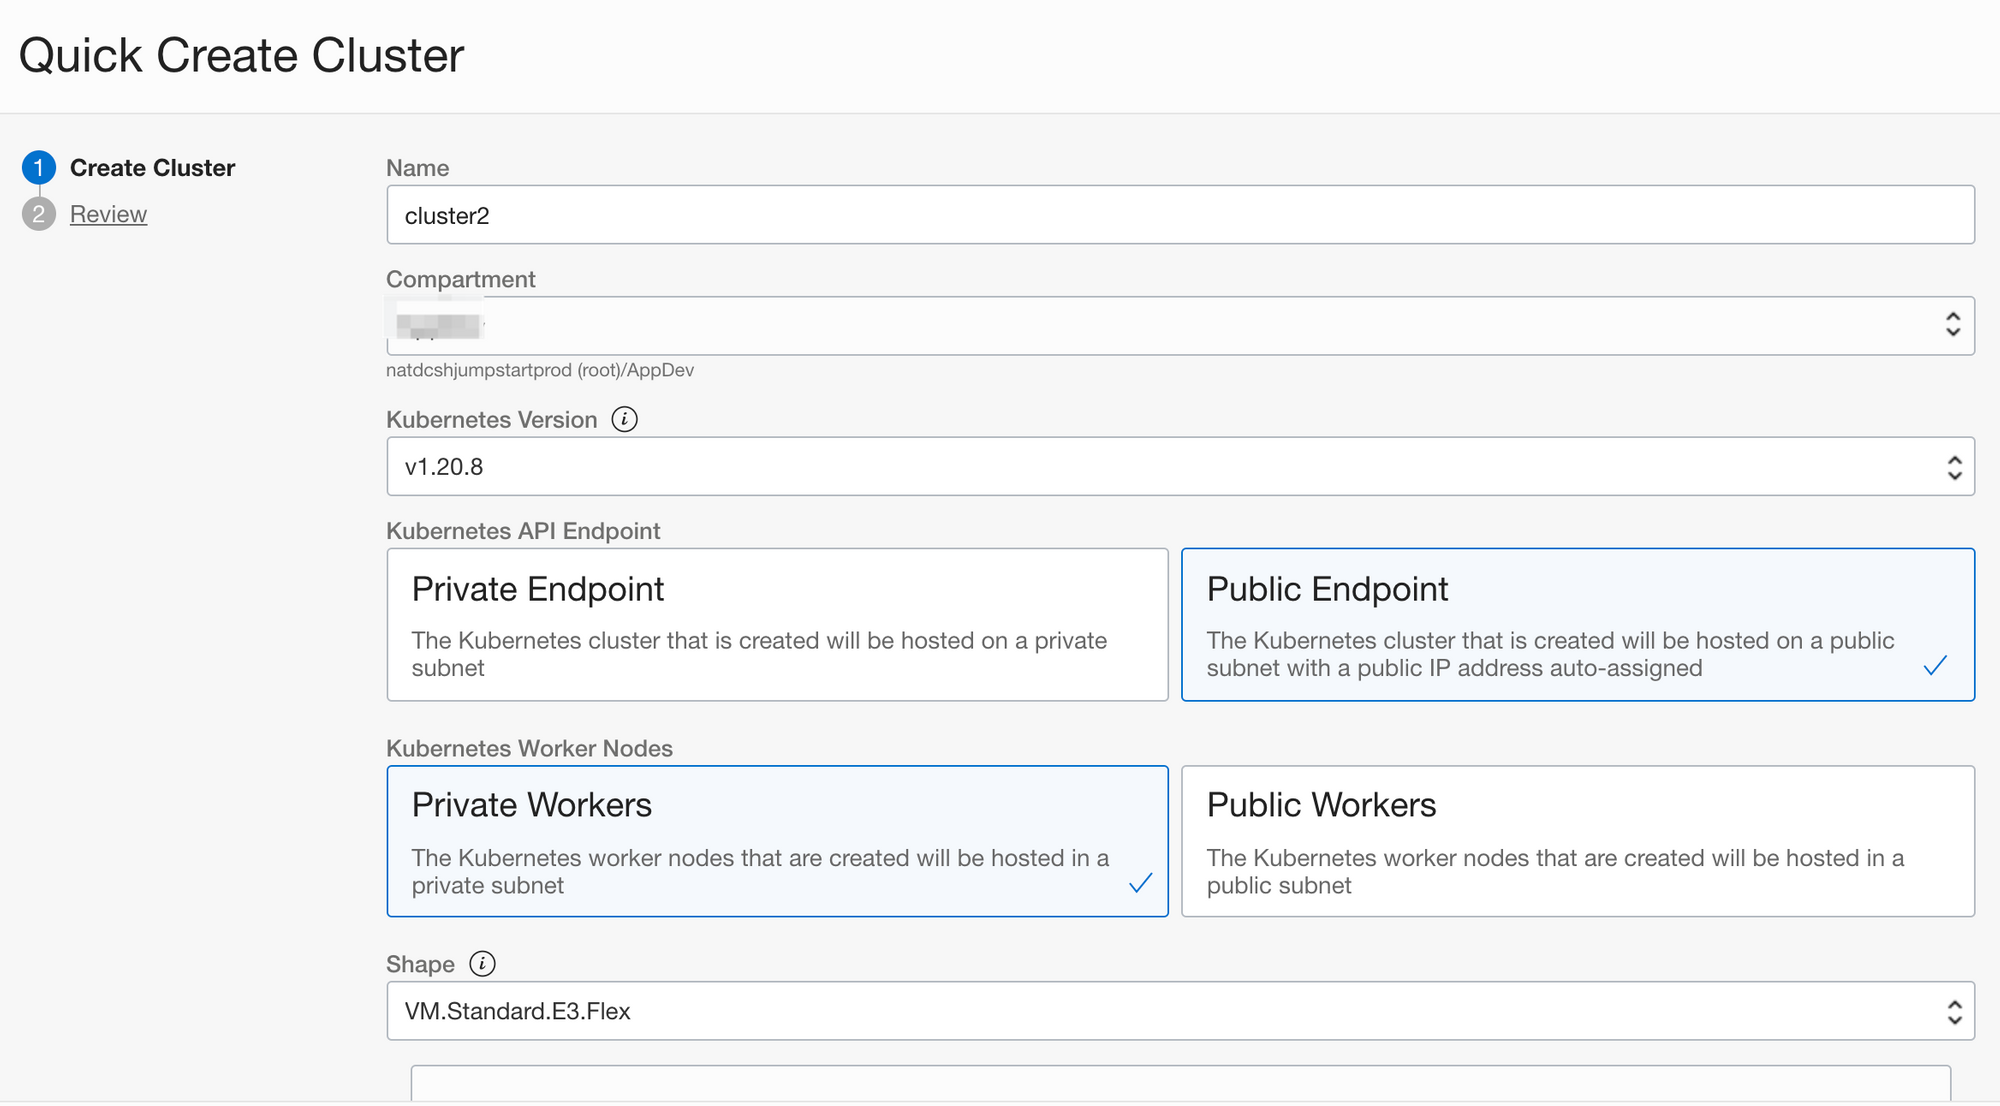
4. Give a name to Cluster. I left everything as default, which is a Cluster with public endpoint and private workers and 3 worker nodes.
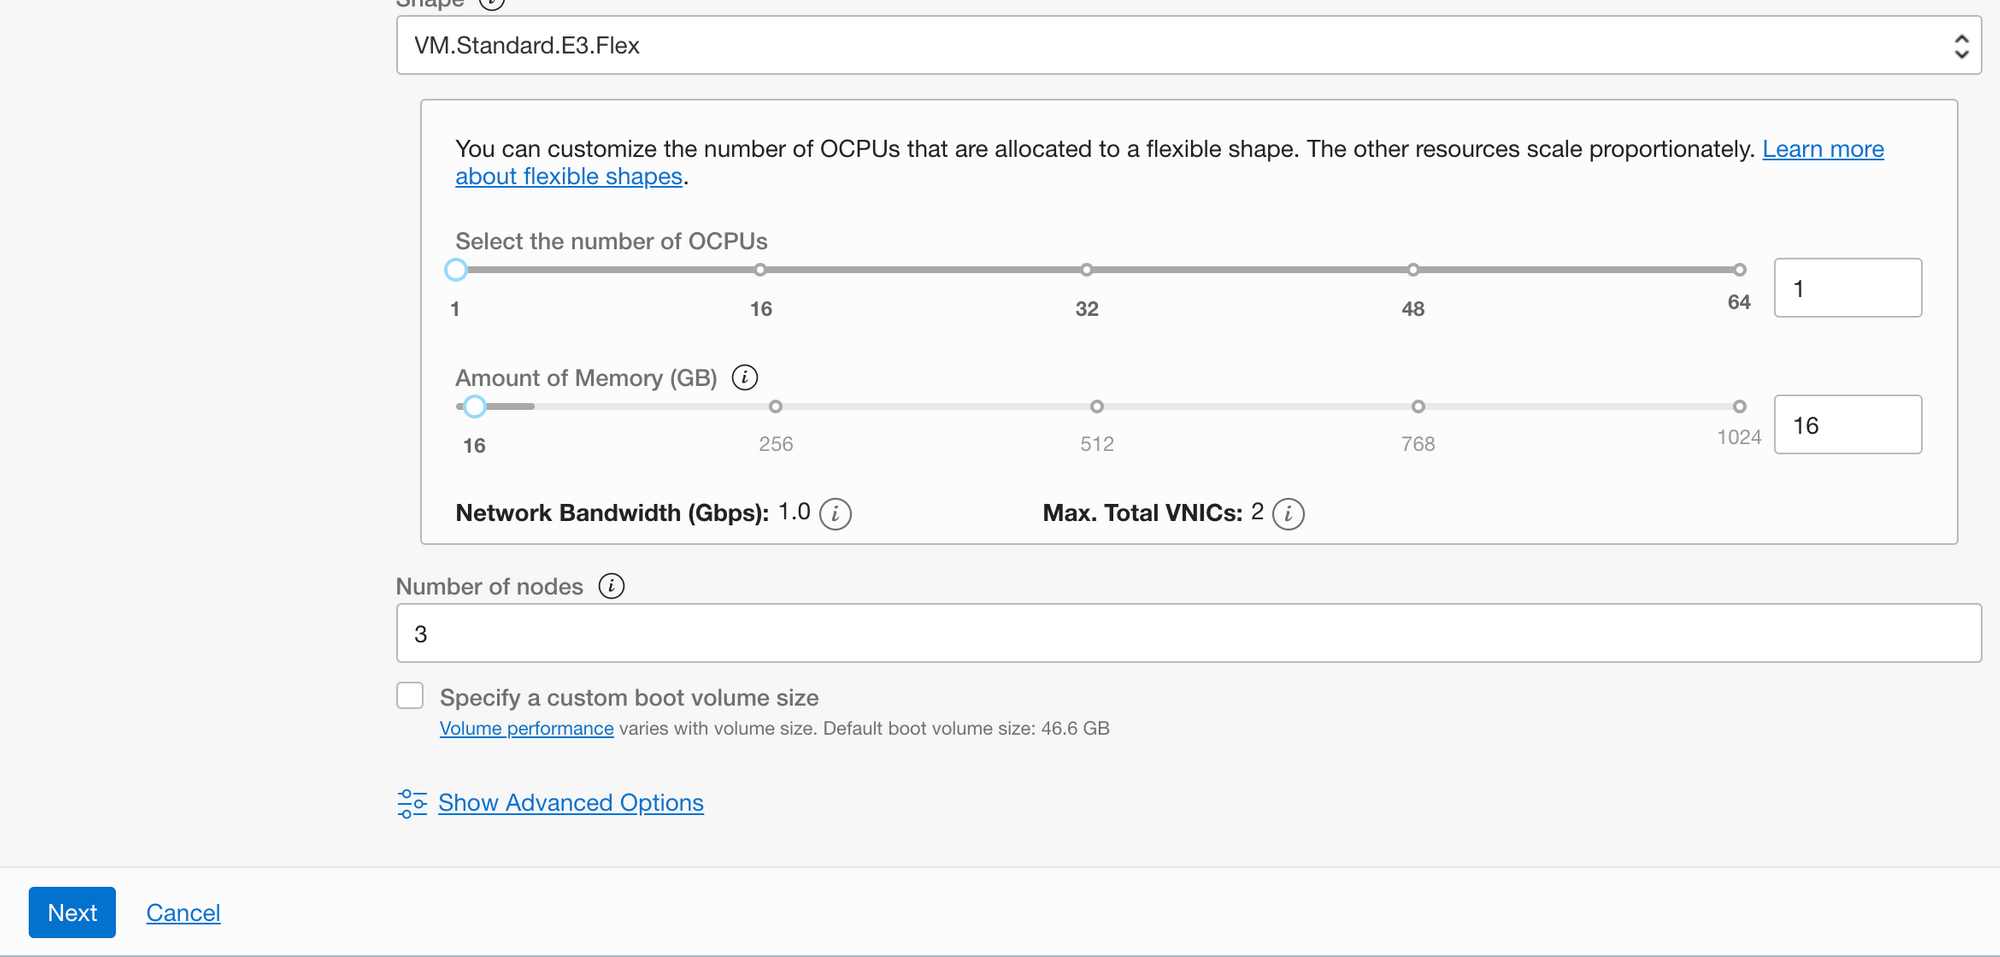
5. Click Next and it will show Review page. Click Create Cluster if everything looks ok. This will provision cluster and networking resources.

Accessing Kubernetes Cluster
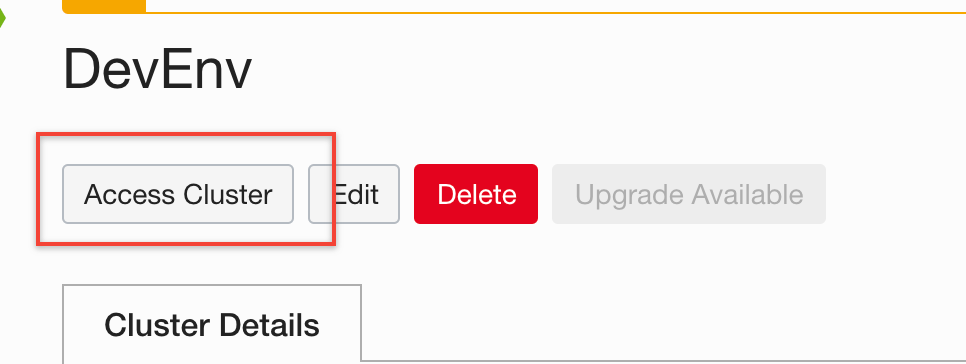
1. Once the cluster is provisioned, click on name of cluster you just provisioned and it will show cluster overview, here click on Access Cluster.
2. We will select Launch Cloud Shell, and follow the steps mentioned.
Note: for purpose of this article but if you have kubectl and docker installed on your local machine feel free to use.
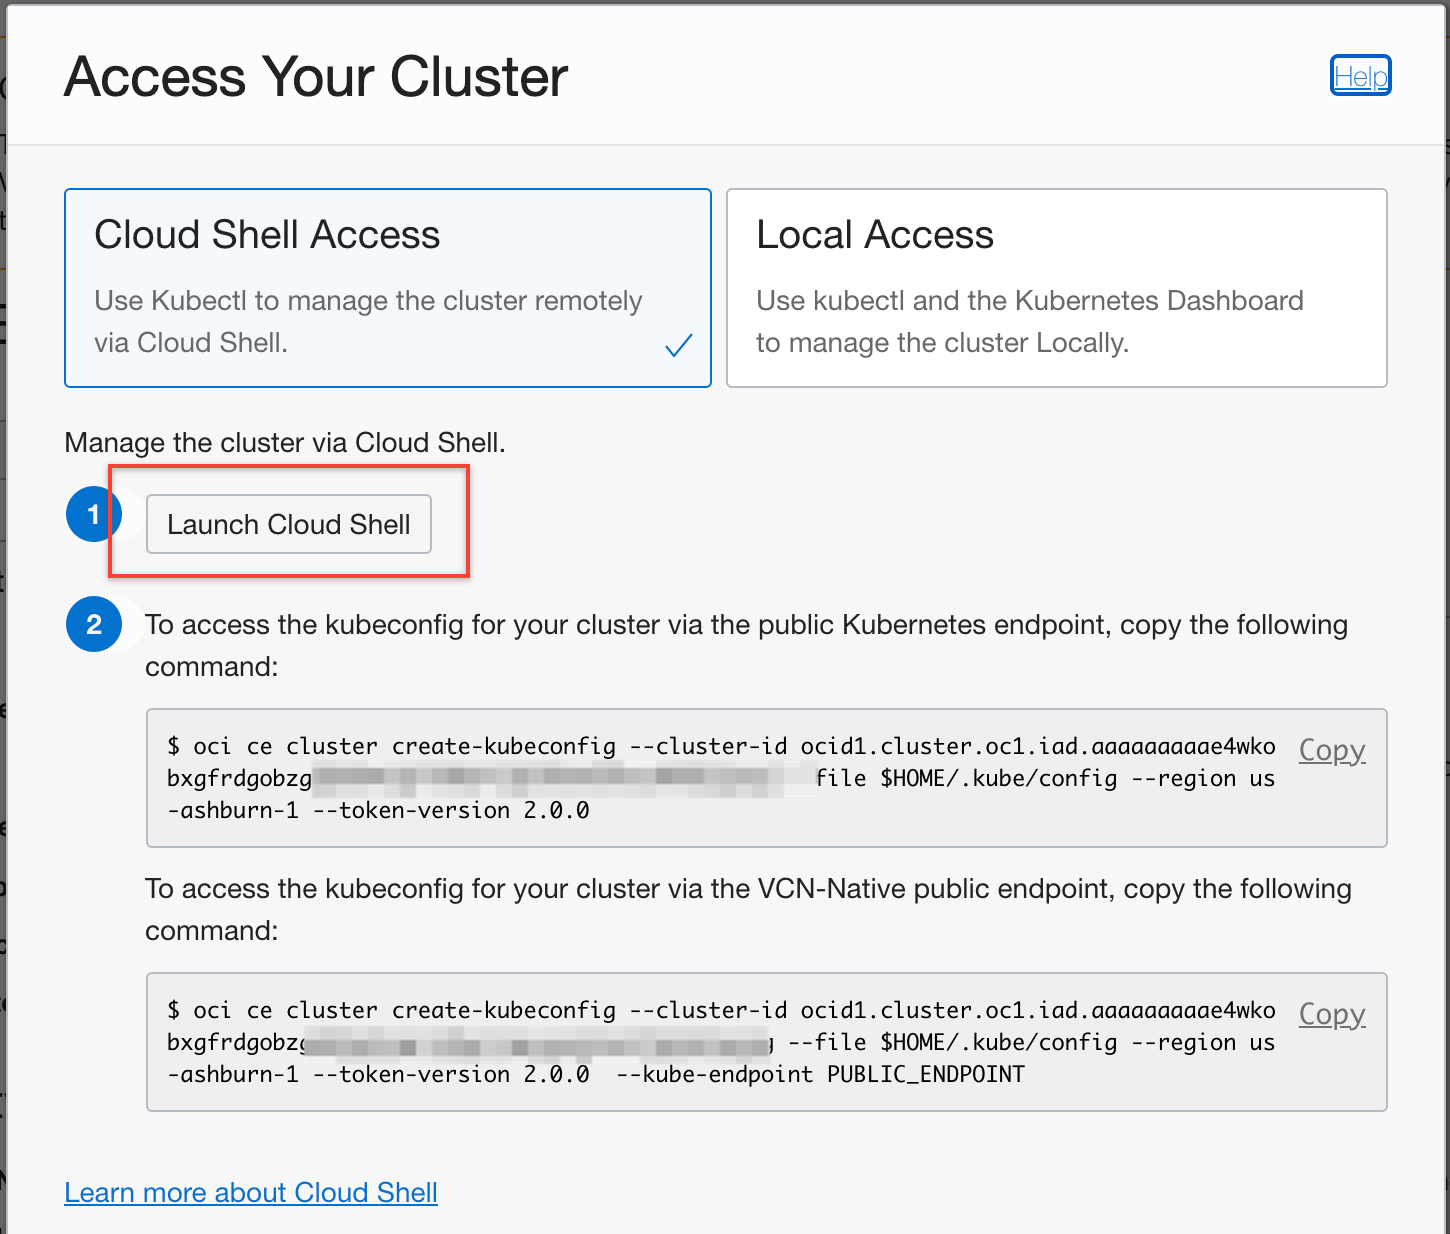
3. Once Cloud Shell is open run the following command to make sure everything is working at this point.
kubectl get nodesAbout application
1. Terminal window will be launched in browser and now clone this repo using following command
git clone https://github.com/varunyn/argo-rollout-oke.git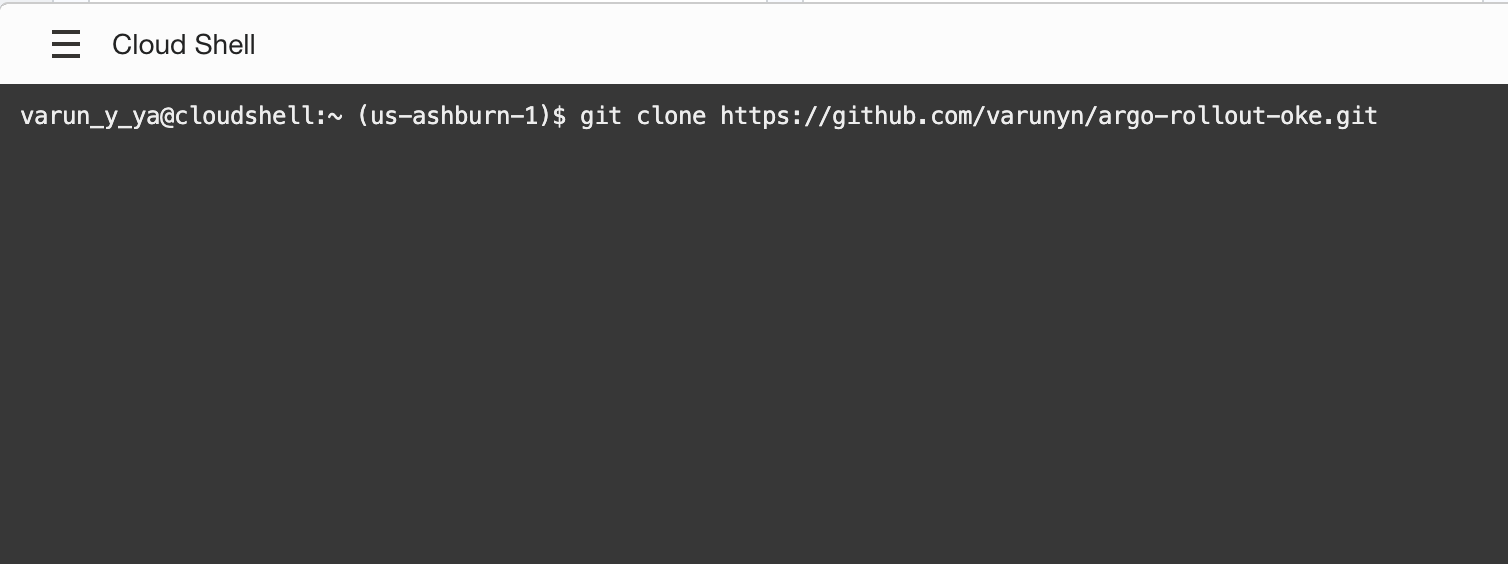
├── Dockerfile
├── README.md
├── argo-deployment.yaml
├── argo-svc.yaml
├── pod.yaml
├── requirements.txt
└── src
    └── app.py
folder structure
It's a simple Python Flask application that gives us a JSON response
from flask_cors import CORS
from flask import Flask, jsonify
import os

app = Flask(__name__)
CORS(app)


@app.route('/')
def response():
    return jsonify({
        'color': os.environ.get('COLOR')
    }), 200


if __name__ == '__main__':
    app.run(debug=True, host='0.0.0.0')
app.py
Building Docker Image and pushing it to Container Registry
1. Run following command. Here we are changing our directory to the cloned repository and then building docker image of our application.
cd argo-rollout-oke/
docker build -t py-app .
2. Once our image is built we need to tag it so that we can push it to OCIR. Check more on docs
docker tag <docker-image-id> <region-key>.ocir.io/<tenancy-namespace>/<repo-name>:<tag>

Example
docker tag 8e0506e14874 iad.ocir.io/ansh81vru1zp/project01/acme-web-app:version2.0.test
3. Follow below steps for Docker login. For more info check docs
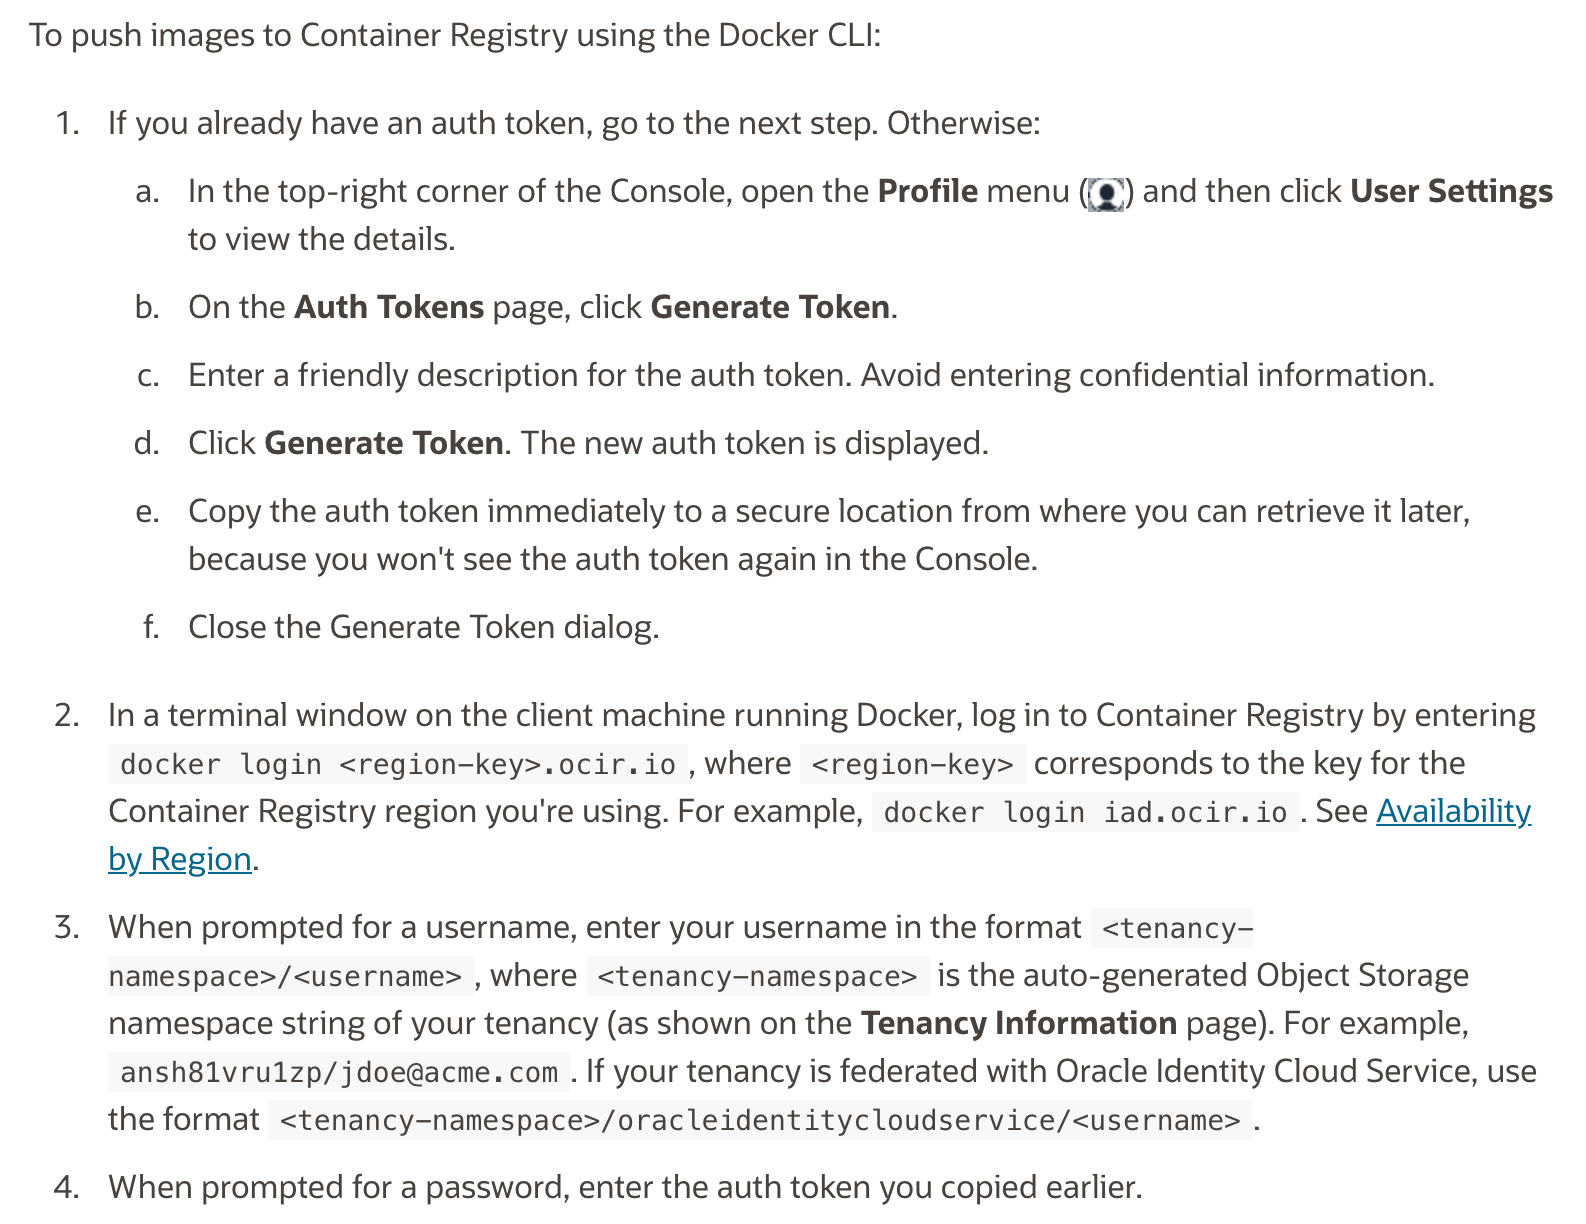
4. Push docker image to container registry.
Note: Following command is an example change the values respective to your env.
docker push iad.ocir.io/ansh81vru1zp/project01/acme-web-app:version2.0.testInstall Argo Rollout Controller
- Run following commands, for more info follow official documentation. This will create new namespace in cluster and install controller
kubectl create namespace argo-rollouts
kubectl apply -n argo-rollouts -f https://github.com/argoproj/argo-rollouts/releases/latest/download/install.yaml
2. Let's create Rollout, I already attached file for this in code.
vi argo-deployment.yamlThe Rollout file will look like this. Difference between k8s Deployment and Rollout
- apiVersion from apps/v1 to argoproj.io/v1alpha1
- kind from Deployment to Rollout
- Add strategy at end, in this case we are doing Canary deployment.
If we take a look at strategy we are saying we want to divert 10 percent traffic to new version and then wait for further instruction.
Note: change image to the image you just pushed to OCIR, I am using the image pushed to my tenancy. Feel free to use it as it is.
apiVersion: argoproj.io/v1alpha1
kind: Rollout
metadata:
  creationTimestamp: null
  labels:
    app: argo-deployment
  name: argo-deployment
spec:
  replicas: 4
  selector:
    matchLabels:
      app: argo-deployment
  template:
    metadata:
      creationTimestamp: null
      labels:
        app: argo-deployment
    spec:
      containers:
        - image: iad.ocir.io/natdcshjumpstartprod/argo:v1
          name: argo
          env:
            - name: COLOR
              value: "RED"
          ports:
            - containerPort: 5000
          resources: {}
  strategy:
    canary:
      steps:
        - setWeight: 10
        # Rollouts can be manually resumed by running `kubectl argo rollouts promote ROLLOUT`
        - pause: {}
        - setWeight: 50
        - pause: { duration: 30 } # two minutes
Finally run the following command to deploy
kubectl apply -f argo-deployment.yamlTo see changes run following command
kubectl argo rollouts get rollout argo-deployment --watchLet's deploy our service as well, so that we can hit our endpoint outside cluster.
Run following command to deploy Service
Note: It will take few minutes to provision because we are using service type of Load Balancer
kubectl apply -f argo-svc.yamlRun following command to see if our service is running
kubectl get svc argo-svcNow let's change the env variable in our deployment file and deploy again to see Canary deployment in effect.
Change value: "BLUE"
vi argo-deployment.yamlapiVersion: argoproj.io/v1alpha1
kind: Rollout
metadata:
creationTimestamp: null
labels:
app: argo-deployment
name: argo-deployment
spec:
replicas: 4
selector:
matchLabels:
app: argo-deployment
template:
metadata:
creationTimestamp: null
labels:
app: argo-deployment
spec:
containers:
- image: iad.ocir.io/natdcshjumpstartprod/argo:v1
name: argo
env:
- name: COLOR
value: "BLUE"
ports:
- containerPort: 5000
resources: {}
strategy:
canary:
steps:
- setWeight: 10
# Rollouts can be manually resumed by running `kubectl argo rollouts promote ROLLOUT`
- pause: {}
- setWeight: 50
- pause: { duration: 30 } # two minutes
Run kubectl apply command for changes to take place
kubectl apply -f argo-deployment.yamlRefresh Service URL multiple times and you will see change in JSON payload. In Shell run the following command to check our rollout status.
kubectl argo rollouts get rollout argo-deployment --watchAnd after that we will promote v2 of our deployment to 50 percent traffic. To promote Rollout,
kubectl argo rollouts promote argo-deploymentConclusion
Hopefully, you learned something new from this article. As next steps you can try Blue Green deployment.
Also, Argo Rollout has dashboard functionality which we can use from the local machine and see visually rollouts.
Reach out to me if any instructions are unclear or not working or you can just say Hi 😀.